完成环境搭建
一、目录的创建
根据一般脚手架的目录结构手动创建以下目录: 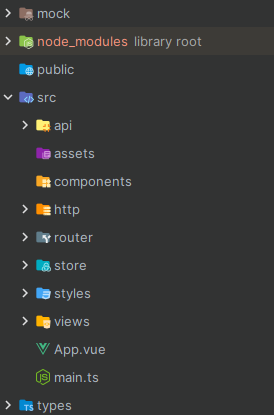 各个目录的作用:
- mock:存放各个模块的模拟数据
- node_modules:项目所需要的包
- public:一般存放不需要经过构建处理的静态资源文件。这些文件会直接被复制到最终打包的目录中,而无需经过Webpack或其他构建工具的处理。
- src:通常是用来存放源代码的地方。这个目录通常包含了你的应用程序的核心代码,包括Vue组件、JavaScript文件、样式表以及其他资源文件。
- api:存放接口的
- assets:通常用于存放静态资源文件,例如图片、字体文件、样式表等
- components:存放页面的公共组件
- http:二次封装axios的目录
- router:存放路由的文件夹
- store:存放状态管理文件
- styles:样式表
- views:存放页面代码的
- App.vue:根页面
- main.ts:项目的入口文件
- types:存放项目的通用TypeScript类型
- index.html:项目的主 HTML 文件,作为整个应用程序的起始页面
二、项目环境的搭建
vue+vite环境搭建
依赖安装
pnpm add vue vue-router pinia pinia-plugin-persistedstate axios nprogress @vitejs/plugin-vue @vitejs/plugin-vue-jsx
环境搭建
- 在主HTML文件编写以下代码
<!doctype html>
<html lang="en">
  <head>
    <meta charset="UTF-8" />
    <link rel="icon" href="/favicon.ico" />
    <meta name="viewport" content="width=device-width, initial-scale=1.0" />
    <title>企业级中台管理系统-模板</title>
  </head>
  <body>
    <!-- 令 id="app" 便于vue进行挂载 -->
    <div id="app"></div>
    <!-- 引入main.ts文件 -->
    <script type="module" src="/src/main.ts"></script>
  </body>
</html>- 在App.vue编写以下代码
<script setup></script>

<template>
  <div id="app">
    <router-view />
  </div>
</template>

<style scoped></style>- 为了项目能够运行起来。我们需要用到构建工具,这里我们用的是vite5,在项目根目录创建vite.config.ts,并编写以下代码:
import { defineConfig, loadEnv } from 'vite'
import type { UserConfig, ConfigEnv } from 'vite'
import { fileURLToPath } from 'url'
import vue from '@vitejs/plugin-vue'
import vueJsx from '@vitejs/plugin-vue-jsx'

export default defineConfig(({ mode }: ConfigEnv): UserConfig => {
  // 获取当前工作目录
  const root = process.cwd()
  // 获取环境变量
  const env = loadEnv(mode, root)
  return {
    // 项目根目录
    root,
    // 项目部署的基础路径
    base: '/',
    publicDir: fileURLToPath(new URL('./public', import.meta.url)), // 无需处理的静态资源位置
    assetsInclude: fileURLToPath(new URL('./src/assets', import.meta.url)), // 需要处理的静态资源位置
    plugins: [
      // Vue模板文件编译插件
      vue(),
      // jsx文件编译插件
      vueJsx(),
    ],
    // 运行后本地预览的服务器
    server: {
      // 指定服务器应该监听哪个 IP 地址。 如果将此设置为 0.0.0.0 或者 true 将监听所有地址,包括局域网和公网地址。
      host: true,
      // 开发环境预览服务器端口
      port: 3000,
      // 启动后是否自动打开浏览器
      open: false,
      // 是否开启CORS跨域
      cors: true,
      // 代理服务器
      // 帮助我们开发时解决跨域问题
      proxy: {
        // 这里的意思是 以/api开头发送的请求都会被转发到 http://xxx:3000
        [env.VITE_APP_API_BASEURL]: {
          target: 'http://localhost:3000',
          // 改变 Host Header
          changeOrigin: true,
          // 发起请求时将 '/api' 替换为 ''
          rewrite: (path) => path.replace(/^\/api/, ''),
        },
        [env.VITE_APP_MOCK_BASEURL]: {
          target: 'http://localhost:3000',
          // 改变 Host Header
          changeOrigin: true,
          // 发起请求时将 '/api' 替换为 ''
          rewrite: (path) => path.replace(/^\/api/, ''),
        },
      },
    },
    // 打包配置
    build: {
      // 关闭 sourcemap 报错不会映射到源码
      sourcemap: false,
      // 打包大小超出 400kb 提示警告
      chunkSizeWarningLimit: 400,
      rollupOptions: {
        // 打包入口文件 根目录下的 index.html
        // 也就是项目从哪个文件开始打包
        input: {
          index: fileURLToPath(new URL('./index.html', import.meta.url)),
        },
        // 静态资源分类打包
        output: {
          format: 'esm',
          chunkFileNames: 'static/js/[name]-[hash].js',
          entryFileNames: 'static/js/[name]-[hash].js',
          assetFileNames: 'static/[ext]/[name]-[hash].[ext]',
        },
      },
    },
    // 配置别名
    resolve: {
      alias: {
        '@': fileURLToPath(new URL('./src', import.meta.url)),
        '#': fileURLToPath(new URL('./types', import.meta.url)),
      },
    },
  }
})为了兼容不同的开发环境,我们创建.env、.env.development、.env.production三个文件
VITE_APP_API_BASEURL = /api

// 需要模拟的请求根路径
VITE_APP_MOCK_BASEURL = /mock/api// 选择 development 模式下是否开启 mock
VITE_APP_USE_MOCK = true// 选择 production 模式下是否开启 mock
VITE_APP_USE_MOCK = false根据不同的环境,我们决定是否开启mock以及不同的环境有着不同的接口根路径。 配置完毕之后,我们需要在package.json文件添加以下代码:
"scripts": {
    "test": "echo \"Error: no test specified\" && exit 1",
    "dev": "vite --mode development",
    "preview": "vite preview",
    "build": "vite build",
},我们还需要编写TypeScript配置文件,在项目根目录创建tsconfig.json,编写以下代码:
{
  "compilerOptions": {
    // 编译出JS的目标ES版本
    "target": "esnext",
    // 使用的ES版本
    "module": "esnext",
    "allowJs": false,
    // 用于选择模块解析策略,有'node'和'classic'两种类型
    "moduleResolution": "node",
    // 开启严格模式
    "strict": true,
    // 强制代码中使用的模块文件名必须和文件系统中的文件名保持大小写一致
    "forceConsistentCasingInFileNames": true,
    // 允许使用 xxx 代替 * as xxx 导入
    "allowSyntheticDefaultImports": true,
    // 指定 jsx 代码的生成: 'preserve', 'react-native', or 'react'
    "jsx": "preserve",
    // 用来指定编译时是否生成.map文件
    "sourceMap": true,
    // 通过为导入内容创建命名空间,实现CommonJS和ES模块之间的互操作性
    "esModuleInterop": true,
    // 是否可以导入 json module
    "resolveJsonModule": true,
    // 是否检测定义了但是没使用的变量
    "noUnusedLocals": true,
    // 是否检查是否有在函数体中没有使用的参数
    "noUnusedParameters": true,
    // 是否启用实验性的装饰器特性
    "experimentalDecorators": true,
    // ts中可以使用的库 这里配置为 dom 与 es模块
    "lib": ["dom", "esnext"],
    // 不允许变量或函数参数具有隐式any类型
    "noImplicitAny": false,
    // 启用阻止对下载库的类型检查
    "skipLibCheck": true,
    // types用来指定需要包含的模块
    "types": ["vite/client", "element-plus/global"],
    // 编译的时候删除注释
    "removeComments": true,
    // 使用绝对路径时使用baseUrl去解析导入路径
    "baseUrl": ".",
    // 为导入路径配置别名
    "paths": {
      "@/*": ["src/*"],
      "#/*": ["types/*"]
    },
    // 配置虚拟目录
    "rootDirs": []
  },
  // 指定需要编译文件
  "include": [
    "src/**/*.ts",
    "src/**/*.d.ts",
    "src/**/*.tsx",
    "src/**/*.vue",
    "types/**/*.d.ts",
    "types/**/*.ts",
    "build/**/*.ts",
    "build/**/*.d.ts",
    "mock/**/*.ts",
    "vite.config.ts"
  ],
  // 指定不需要编译的文件
  "exclude": ["node_modules", "dist", "**/*.js"]
}除此之外,为了TypeScript能够识别,我们还在声明类型,在types文件夹创建**env.d.ts,**编写以下代码:
/// <reference types="vite/client" />

declare module '*.vue' {
  import { defineComponent } from 'vue'
  const component: defineComponent
  export default component
}

declare module '*.cjs'

declare module 'element-plus'

interface ImportMetaEnv {
  // 我们每次添加完新的环境变量就在此添加一次ts类型
  // 这样我们就能在使用 import.meta.env 时获得ts语法提示
  readonly VITE_APP_API_BASEURL: string
}

interface ImportMeta {
  readonly env: ImportMetaEnv
}- 配置完环境之后,为了项目能够真正运行在浏览器,我们还需要在项目的入口文件引入我们下载的依赖以及编写相对应的入口文件,比如路由的入口文件、状态管理的入口等
import { createApp } from 'vue'

import App from './App.vue'
import './styles/index.less'

import router from './router'
import store from './store'

const app = createApp(App)
app.use(router)
app.use(store)
app.mount('#app')import { createRouter, createWebHashHistory, RouteRecordRaw } from 'vue-router'
import NProgress from 'nprogress'
import 'nprogress/nprogress.css'
const routes: Array<RouteRecordRaw> = []
const modules: Record<string, any> = import.meta.glob('./modules/*.ts', {
eager: true,
})
Object.keys(modules).forEach((key) => {
const module = modules[key]
routes.push(module.default)
})
const router = createRouter({
history: createWebHashHistory(),
routes,
})
router.beforeEach((to, from, next) => {
NProgress.start()
next()
})
router.afterEach(() => {
NProgress.done()
})
export default routerimport { createPinia } from 'pinia'
import piniaPluginPersistedstate from 'pinia-plugin-persistedstate'
const store = createPinia()
store.use(piniaPluginPersistedstate)
export default storeeslint、prettier、stylelint、commitlint配置
eslint配置
依赖安装
pnpm install -D eslint @eslint/create-config
环境配置
以npx eslint --init生成配置文件.eslintrc.js,编写以下代码:
module.exports = {
  env: {
    browser: true,
    es2021: true,
    node: true,
    jest: true,
  },
  /* 指定如何解析语法 */
  parser: 'vue-eslint-parser',
  /** 优先级低于 parse 的语法解析配置 */
  parserOptions: {
    ecmaVersion: 'latest',
    sourceType: 'module',
    parser: '@typescript-eslint/parser',
    jsxPragma: 'React',
    ecmaFeatures: {
      jsx: true,
    },
  },
  /* 继承已有的规则 */
  extends: [
    'eslint:recommended',
    'plugin:vue/vue3-essential',
    'plugin:@typescript-eslint/recommended',
    'plugin:prettier/recommended',
  ],
  plugins: ['vue', '@typescript-eslint'],
  /*
   * "off" 或 0    ==>  关闭规则
   * "warn" 或 1   ==>  打开的规则作为警告(不影响代码执行)
   * "error" 或 2  ==>  规则作为一个错误(代码不能执行,界面报错)
   */
  rules: {
    // eslint(https://eslint.bootcss.com/docs/rules/)
    'no-var': 'error', // 要求使用 let 或 const 而不是 var
    'no-multiple-empty-lines': ['warn', { max: 1 }], // 不允许多个空行
    'no-console': process.env.NODE_ENV === 'production' ? 'error' : 'off',
    'no-debugger': process.env.NODE_ENV === 'production' ? 'error' : 'off',
    'no-unexpected-multiline': 'error', // 禁止空余的多行
    'no-useless-escape': 'off', // 禁止不必要的转义字符

    // typeScript (https://typescript-eslint.io/rules)
    '@typescript-eslint/no-unused-vars': 'error', // 禁止定义未使用的变量
    '@typescript-eslint/prefer-ts-expect-error': 'error', // 禁止使用 @ts-ignore
    '@typescript-eslint/no-explicit-any': 'off', // 禁止使用 any 类型
    '@typescript-eslint/no-non-null-assertion': 'off',
    '@typescript-eslint/no-namespace': 'off', // 禁止使用自定义 TypeScript 模块和命名空间。
    '@typescript-eslint/semi': 'off',

    // eslint-plugin-vue (https://eslint.vuejs.org/rules/)
    'vue/multi-word-component-names': 'off', // 要求组件名称始终为 “-” 链接的单词
    'vue/script-setup-uses-vars': 'error', // 防止<script setup>使用的变量<template>被标记为未使用
    'vue/no-mutating-props': 'off', // 不允许组件 prop的改变
    'vue/attribute-hyphenation': 'off', // 对模板中的自定义组件强制执行属性命名样式
  },
}配置完以上规则之后,我们可以再package.json文件新增一条指令来对代码进行修复
"scripts": {
  "lint:eslint": "eslint src/**/*.{ts,vue} --cache --fix",
  "lint": "eslint src",
    "fix": "eslint src --fix"
}
prettier配置
prettier的配置根eslint的配置类似,都是安装依赖以及创建配置文件,prettier需要安装以下依赖: pnpm add prettier -D,除此以外,为了防止prettier与eslint冲突,我们还需要安装一下依赖:
eslint-config-prettier:关闭eslint中与prettier相互冲突的规则eslint-plugin-prettier:赋予eslint用prettier格式化代码的能力。 安装依赖并修改.eslintrc文件
{
  "singleQuote": true,
  "semi": false,
  "bracketSpacing": true,
  "htmlWhitespaceSensitivity": "ignore",
  "endOfLine": "auto",
  "trailingComma": "all",
  "tabWidth": 2
}
除此以外,我们还需要再.eslintrc.js文件中添加一下代码
extends: [
  'plugin:prettier/recommended',
]
stylelint
stylelint是为了校验代码中样式的编写,他的配置与eslint也非常类似,除此之外,我们还需要安装依赖避免他与prettier冲突。 pnpm install -D stylelint stylelint-config-standardpnpm install -D stylelint-config-prettier stylelint-config-html stylelint-order stylelint-less postcss-html postcss-less stylelint-config-standard-vue
- stylelint-config-standard:StyleLint 推荐配置
- stylelint-config-prettier:关闭与 prettier 冲突的配置
- stylelint-config-standard-vue:StyleLint Vue 项目推荐配置
- postcss-html postcss-less:支持检查 less 与 html
- stylelint-order:支持 css 样式排序
编写配置文件.stylelintrc.js
module.exports = {
  // 继承推荐规范配置
  extends: [
    'stylelint-config-standard',
    'stylelint-config-prettier',
    'stylelint-config-recommended-less',
    'stylelint-config-standard-vue',
  ],
  // 添加规则插件
  plugins: ['stylelint-order'],
  // 不同格式的文件指定自定义语法
  overrides: [
    {
      files: ['**/*.(scss|css|vue|html)'],
      customSyntax: 'postcss-less',
    },
    {
      files: ['**/*.(html|vue)'],
      customSyntax: 'postcss-html',
    },
  ],
  // 忽略检测文件
  ignoreFiles: [
    '**/*.js',
    '**/*.jsx',
    '**/*.tsx',
    '**/*.ts',
    '**/*.json',
    '**/*.md',
    '**/*.yaml',
  ],
  // 自定义配置规则
  rules: {
    // 便于配置变量 关闭未知属性检测
    'property-no-unknown': null,
    // 指定类选择器的模式
    'selector-class-pattern': null,
    // 允许 Vue 的 global
    'selector-pseudo-class-no-unknown': [
      true,
      {
        ignorePseudoClasses: ['global'],
      },
    ],
    // 允许 Vue 的 v-deep
    'selector-pseudo-element-no-unknown': [
      true,
      {
        ignorePseudoElements: ['v-deep'],
      },
    ],
    // 允许对应内核前缀
    'property-no-vendor-prefix': null,
    // 指定样式的排序 修复后会帮我们自动整理CSS样式的顺序
    'order/properties-order': [
      'position',
      'top',
      'right',
      'bottom',
      'left',
      'z-index',
      'display',
      'justify-content',
      'align-items',
      'float',
      'clear',
      'overflow',
      'overflow-x',
      'overflow-y',
      'padding',
      'padding-top',
      'padding-right',
      'padding-bottom',
      'padding-left',
      'margin',
      'margin-top',
      'margin-right',
      'margin-bottom',
      'margin-left',
      'width',
      'min-width',
      'max-width',
      'height',
      'min-height',
      'max-height',
      'font-size',
      'font-family',
      'text-align',
      'text-justify',
      'text-indent',
      'text-overflow',
      'text-decoration',
      'white-space',
      'color',
      'background',
      'background-position',
      'background-repeat',
      'background-size',
      'background-color',
      'background-clip',
      'border',
      'border-style',
      'border-width',
      'border-color',
      'border-top-style',
      'border-top-width',
      'border-top-color',
      'border-right-style',
      'border-right-width',
      'border-right-color',
      'border-bottom-style',
      'border-bottom-width',
      'border-bottom-color',
      'border-left-style',
      'border-left-width',
      'border-left-color',
      'border-radius',
      'opacity',
      'filter',
      'list-style',
      'outline',
      'visibility',
      'box-shadow',
      'text-shadow',
      'resize',
      'transition',
    ],
  },
}
commitlint与husky
commitlint与husky是相辅相成的,都是为了我们的git提交更加规范,首先我们先配置commitlint
- 安装依赖:
**pnpm add @commitlint/config-conventional @commitlint/cli -D** - 编写配置文件commitlint.config.cjs
// 这里是通俗的解释 详情请前往官方文档查阅
module.exports = {
  ignores: [(commit) => commit.includes('init')],
  extends: ['@commitlint/config-conventional'],
  rules: {
    // 信息以空格开头
    'body-leading-blank': [2, 'always'],
    'footer-leading-blank': [2, 'always'],
    // 信息最大长度
    'header-max-length': [2, 'always', 108],
    // 信息不能未空
    'subject-empty': [2, 'never'],
    // 信息类型不能未空
    'type-empty': [2, 'never'],
    // 提交信息的类型 下文有介绍
    'type-enum': [
      2,
      'always',
      [
        'feat',
        'fix',
        'perf',
        'style',
        'docs',
        'test',
        'refactor',
        'build',
        'ci',
        'chore',
        'revert',
        'wip',
        'workflow',
        'types',
        'release',
        'temp',
      ],
    ],
  },
}然后配置husky
- 安装依赖:
**pnpm add husky -D** - 生成.husky文件夹:
**npx husky-init** - 在pre-commit添加一下信息:
#!/usr/bin/env sh
. "$(dirname -- "$0")/_/husky.sh"
pnpm run format- 生成commit-msg并编写以下代码:
#!/usr/bin/env sh
. "$(dirname -- "$0")/_/husky.sh"
pnpm commitlint最终我们完成这些配置之后,在package.json文件添加的命令如下:
"scripts": {
    "test": "echo \"Error: no test specified\" && exit 1",
    "dev": "vite --mode development",
    "preview": "vite preview",
    "build": "vite build",
    "lint": "eslint src",
    "fix": "eslint src --fix",
    "format": "prettier --write \"./**/*.{html,vue,ts,js,json,md}\"",
    "lint:eslint": "eslint src/**/*.{ts,vue} --cache --fix",
    "lint:style": "stylelint src/**/*.{css,less,vue} --cache --fix",
    "commitlint": "commitlint --config commitlint.config.cjs -e -V"
},lint-staged配置
在完成以上配置之后,我们其实已经可以更加规范的开发项目了,不过好像每一个我们在提交我们写的代码时,都要手动执行命令去规范我们的代码,为了简便操作,lint-staged应运而生,他可以在我们提交项目之前对我们的代码进行校验以及校正,首先我们先安装这个依赖 pnpm add lint-staged -D 安装好这个依赖之后,我们需要对这个项目进行配置,我们可以像之前一样编写一个配置文件,除此之外,我们也可以直接在package.json文件进行配置,具体如下:
"lint-staged": {
    "*.{js,jsx,ts,tsx}": [
      "eslint --fix",
      "prettier --write"
    ],
    "{!(package)*.json,*.code-snippets,.!(browserslist)*rc}": [
      "prettier --write--parser json"
    ],
    "package.json": [
      "prettier --write"
    ],
    "*.vue": [
      "eslint --fix",
      "prettier --write",
      "stylelint --fix"
    ],
    "*.{scss,less,styl,html}": [
      "stylelint --fix",
      "prettier --write"
    ],
    "*.md": [
      "prettier --write"
    ]
  }
写好这些配置文件之后,我们对husky进行修改
#!/usr/bin/env sh
. "$(dirname -- "$0")/_/husky.sh"

npx --no-install commitlint --edit#!/usr/bin/env sh
. "$(dirname -- "$0")/_/husky.sh"
pnpm run lint:lint-staged集成element-plus
安装依赖
pnpm add element-plus @element-plus/icons-vuepnpm install -D unplugin-auto-import unplugin-element-plus unplugin-icons unplugin-vue-components 第一个安装的是组件库以及element提供的图标库,第二个安装的目的是为了element-plus的按需引入以及全局注册图标(这样就不会每次引用都要import了,当然除了ElMessage这类的组件还需要引入),这样能够节约项目打包后的体积。
编写配置
// 依赖引入
import AutoImport from 'unplugin-auto-import/vite'
import Icons from 'unplugin-icons/vite'
import Components from 'unplugin-vue-components/vite'
import IconsResolver from 'unplugin-icons/resolver'
import ElementPlus from 'unplugin-element-plus/vite'
import { ElementPlusResolver } from 'unplugin-vue-components/resolvers'
// 在plugins配置添加一下代码
plugins: [
      // 开启ElementPlus自动引入CSS
      ElementPlus({}),
      AutoImport({
        resolvers: [IconsResolver(), ElementPlusResolver()],
        dts: fileURLToPath(
          new URL('./types/auto-imports.d.ts', import.meta.url),
        ),
      }),
      // 自动注册组件
      Components({
        resolvers: [IconsResolver(), ElementPlusResolver()],
        dts: fileURLToPath(new URL('./types/components.d.ts', import.meta.url)),
      }),
      // 自动安装图标
      Icons({
        autoInstall: true,
      }),
  ],
集成mock
安装依赖
pnpm install -D mockjs vite-plugin-mock
编写配置
// 依赖引入
import { viteMockServe } from 'vite-plugin-mock'
// 在plugins添加一下代码
plugins: [
  viteMockServe({
      // 如果接口为 /mock/xxx 以 mock 开头就会被拦截响应配置的内容
      mockPath: 'mock', // 数据模拟需要拦截的请求起始 URL
      enable: Boolean(env.VITE_APP_USE_MOCK), // 是否开启Mock
    }),
]
编写接口
import type { MockMethod } from 'vite-plugin-mock'

export default [
  {
    url: '/mock/api/login',
    method: 'post',
    response: ({ body }) => {
      if (body.username !== body.password) {
        return {
          code: 1,
          message: '密码错误',
          data: {
            username: '',
            roles: [],
            accessToken: '',
          },
        }
      }
      if (body.username === 'admin') {
        return {
          code: 0,
          message: '登录成功',
          data: {
            username: 'admin',
            roles: ['admin'],
            accessToken: 'admin',
          },
        }
      } else {
        return {
          code: 0,
          message: '登录成功',
          data: {
            username: 'common',
            roles: ['common'],
            accessToken: 'common',
          },
        }
      }
    },
  },
] as MockMethod[]项目中所用到的依赖的版本
"dependencies": {
    "@element-plus/icons-vue": "^2.3.1",
    "axios": "^1.6.1",
    "element-plus": "^2.6.0",
    "nprogress": "^0.2.0",
    "pinia": "^2.1.7",
    "pinia-plugin-persistedstate": "^3.2.0",
    "vue": "^3.4.21",
    "vue-router": "^4.2.5"
  },
  "devDependencies": {
    "@commitlint/cli": "^18.6.1",
    "@commitlint/config-conventional": "^18.4.0",
    "@eslint/create-config": "^0.4.6",
    "@iconify-json/ep": "^1.1.14",
    "@types/node": "^20.9.0",
    "@types/nprogress": "^0.2.3",
    "@typescript-eslint/eslint-plugin": "^6.10.0",
    "@typescript-eslint/parser": "^6.10.0",
    "@vitejs/plugin-vue": "^4.4.1",
    "@vitejs/plugin-vue-jsx": "^3.0.2",
    "eslint": "^8.53.0",
    "eslint-config-prettier": "^9.0.0",
    "eslint-plugin-prettier": "^5.0.1",
    "eslint-plugin-vue": "^9.18.1",
    "husky": "^8.0.3",
    "less": "^4.2.0",
    "lint-staged": "^15.1.0",
    "postcss-html": "^1.5.0",
    "postcss-less": "^6.0.0",
    "prettier": "^3.0.3",
    "stylelint": "^15.11.0",
    "stylelint-config-html": "^1.1.0",
    "stylelint-config-prettier": "^9.0.5",
    "stylelint-config-recommended-less": "^3.0.1",
    "stylelint-config-standard": "^34.0.0",
    "stylelint-config-standard-vue": "^1.0.0",
    "stylelint-less": "^2.0.0",
    "stylelint-order": "^6.0.3",
    "typescript": "^5.2.2",
    "unplugin-auto-import": "^0.17.5",
    "unplugin-element-plus": "^0.8.0",
    "unplugin-icons": "^0.18.5",
    "unplugin-vue-components": "^0.26.0",
    "vite": "^5.1.4",
    "vite-plugin-mock": "^3.0.1",
    "vue-tsc": "^1.8.22"
  },