webpack高级
一、source-map
作用
- 能够从已转换的代码,映射到原始的源文件
- 使浏览器能够重构原始源并在调试其中显示重建的原始源
如何使用source-map
- 通过webpack配置生成source-map
- 在转换后的代码,最后添加一个注释,指向source-map(例如:
// sourceMappingURL=common.bundle.js.map)
webpack配置
https://webpack.docschina.org/configuration/devtool/#devtool
module.exports = {
	mode: 'production',
	devtool: 'source-map'
}
不会生成source-map文件的配置
- false
- none(production模式下的默认值)
- eval(development模式下的默认值)
不常见的source-map配置
- eval-source-map(不生成source-map文件,以
DataURL的形式放在eval函数后面) - inline-source-map(不生成source-map文件,以
DataURL的形式放在打包文件的后面) - cheap-source-map(更加高效,不会映射列信息,配置在development)
- cheap-module-source-map(类似于**cheap-source-map,**源自loader的source-map处理会更好,配置在development)
- hidden-source-map(会生成source-map文件,但删除的对应的引用注释,需要手动加
//# sourceMappingURL=bundle.js.map) - nosources-source-map(生成的source-map文件只有错误信息,不会生成源代码)
二、babel
为什么需要babel?
部分浏览器可能不认识ES6+的语法,以及不认识vue、react、typescript代码,因此需要babel将这些代码转换为浏览器认识的普通的JavaScript。
babel命令行使用
- 安装
@babel/core - 安装
@babel/cli - 安装插件(
@babel/plugin-transform-block-scoping、@babel/plugin-transform-arrow-function) - 执行命令
npm i @babel/core @babel/cli -D
npx babel ./src --out-dir ./dist --plugins=@babel/plugin-transform-block-scoping,@babel/plugin-transform-arrow-function
babel预设
解决每一次转换都需要安装一种插件的问题
npm install @babel/preset-env -D
npx babel ./src --out-dir ./dist --presets=@babel/preset-env
babel的底层原理
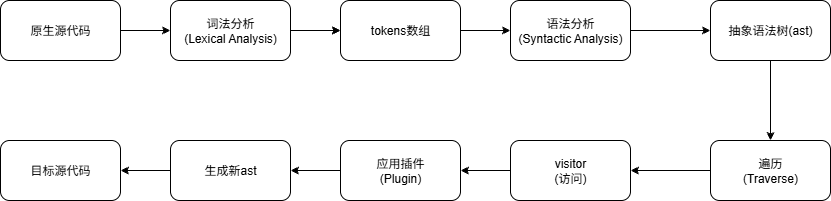
babel是一种编译器,将一种源代码转换为另一种源代码
babel的工作流程
- 解析阶段(Parsing)
- 转换阶段(Transformation)
- 生成阶段(Code Generation)
babel的配置文件
babel.config.json|js|mjs|cjs.babelrc.json|js|mjs|cjs或者.babelrc
module.exports = {
	presets: [
		["@babel/preset-env"]
	]
}
三、browserslist工具
browserslist是一个在不同的前端工具之间,共享目标浏览器和Node.js版本的配置
浏览器查询过程
我们会编写类似于下面的配置:
> 1%
last 2 version
not dead那么之后,这些工具如babel等就会根据我们的配置来获取相关的浏览器信息,以方便决定是否需要进行兼容性的支持。
browserslist编写
规则一
- defaults: 默认浏览器配置(>0.5%,last 2 version,FireFox ESR, not dead)
- 5%:通过全局使用情况统计信息选择的浏览器版本,表示市场占有率。可以使用≥、<、和≤修饰。
- dead:表示24个月内没有官方支持或者更新的浏览器。
- last 2 version: 表示每个浏览器的最后两个版本
规则二
- node 10:选择最新的Node.js 10.x.x
- ios7: 直接使用ios浏览器版本7
- not ie≤8:排除先前查询选择的浏览器
配置browserslist
- 方案一:在package.json文件配置
- 方案二:.browserslistrc文件
json{ "browserslist": [ "last 2 version", "not dead", ">0.2%" ] }bash>1% not dead last 2 version
babel配置覆盖browserslist
module.exports = {
	module: {
		rules: [
			{
				test: /\.js$/,
				use: [
					{
						loader: 'babel-loader',
						options: {
							presets: [
								["@babel/preset-env", {
									targets: ">5%"
								}]
							]
						}
					}
				]
			}
		]
	}
}四、polyfill
为什么使用polyfill
但我们用到一些新的语法特性,比如Promise、Generator、Symbol等api时,某些浏览器根本不认识这些api,并且使用babel也没有用(因为babel只能将高级语法转化为较为低版本的语法,而无法给你创造api)。这是就需要polyfill给JavaScript加上补丁
如何使用polyfill
npm i core-js regenerator-runtime// babel.config.js
module.exports = {
presets: [
["@babel/preset-env", {
corejs: 3,
useBuiltIns: false
}]
]
}- corejs:设置core-js版本
- useBuiltIns:设置以什么样的方式使用polyfill
- false:不使用polyfill
- usage:使用polyfill(忽略第三方库)√
- entry:使用polyfill(第三方库如vue也参与polyfill),需要在主入口文件加入
import 'core-js/stabel'和import 'regenetator-runtime/runtime'
五、webpack搭建react环境
- 安装
react和react-dom - 安装处理jsx对应的babel插件
@babel/plugin-systax-js@babel/plugin-transform-react-js@babel/plugin-transform-react-display-name
- 或者安装对应的预设
@babel/preset-react - 创建打包的html模板
npm i react react-dom
npm i html-webpack-plugin -D
npm i @babel/plugin-systax-js @babel/plugin-transform-react-js @babel/plugin-transform-react-display-name -D
npm i @babel/preset-react -D// src/index.js
import React from 'react'
import ReactDOM from 'react-dom/client'
import App from './src/App.js'
ReactDOM.createRoot(document.getElementById('root')!).render(
<React.StrictMode>
<App />
</React.StrictMode>
)// App.js
import { memo } from 'react'
const App = memo(() => {
return <div>App</div>
})
export default App// webpack.config.js
import HtmlWebpackPlugin from 'html-webpack-plugin'
module.exports = {
module: {
rules: [
{
test: /\.js?$/,
use: {
loader: 'babel-loader'
}
}
]
},
plugins: [
new HtmlWebpackPlugin({
template: './index.html'
})
]
}六、编译TypeScript
- ts-loader
- babel
@babel/preset-typescript- 优势:可以配置polyfill
- 确点:不会进行类型检测
module.exports = {
	module: {
		rules: [
			{
				test: /\.ts?$/,
				exclude: /node_modules/
				use: {
					loader: 'ts-loader'
				}
			}
		]
	}
}// babel.config.js
module.exports = {
presets: ["@babel/preset-env", "@babel/preset-env", "@babel/preset-typescript"]
}使用tsc校验类型
{
	scripts: {
		"ts-check": "tsc --noEmits",
		"ts-check-watch": "tsc --noEmits --watch"
	}
}
七、webpack本地服务器
webpack-dev-server在编译之后不会写入到任何输出文件,而是将bundle文件保存在内存当中
devServer属性
- static:静态文件存储目录
- 默认为public
- liveReload:当代码编译失败时是否重新刷新整个页面
- 默认为false,会刷新整个页面
- port:监听的端口号
- 默认为8080
- compress:对代码进行压缩
- proxy:解决跨域问题
- changeOrigin:改变请求头的host
- 不设置时为项目请求地址,设置为true时为服务器的地址
- historyApiFallback:解决SPA应用在路由跳转之后,进行页面刷新时出现404错误的问题
// webpack新写法
*module.exports = {
	devServer: {
		proxy: [
			{
				context: ['/api'],
				target: 'http://localhost:3000'
			}
		]
	}
}*
// webpack旧写法(已废弃)
*module.exports = {
	devServer: {
		proxy: {
			'/api': {
				target: 'http://localhost:3000'
			}
		}
	}
}*八、webpack性能优化
代码分离
为什么要代码分离?
不分离将所有代码打包到一个文件,导致文件体积较大,首屏渲染速度较慢,用户会长时间看到空白页面
代码分离的方法
- 多入口
- 动态导入
- ECMAScript中的import语法
- 魔法注释
- 用于修改非入口文件打包后的name
- splitChunks自定义分包
- chunks:默认为**
async**
- chunks:默认为**
// webpack.config.js(多入口)
module.exports = {
	// 多个产物
	entry: {
		index: './src/index.js',
		main: './src/main.js'
	},
	// 单产物
	// entry: ['./src/index.js', './src/main.js'],
}
// 共享代码
module.exports = {
	entry: {
		index: {
			import: './src/index.js',
			dependOn: 'shared'
		},
		main: {
			import: './src/main.js',
			dependOn: 'shared'
		},
		shared: ['axios']
	}
}// 动态导入
const btn1 = document.createElement('button')
const btn2 = document.createElement('button')
btn1.textContent = 'Category'
btn2.textContent = 'About'
document.body.append(btn1)
document.body.append(btn2)
btn1.addEventListener('click', () => {
import(/* webpackChunkName: "category" */ './router/category')
})
btn2.addEventListener('click', () => {
import(/* webpackChunkName: "about" */ './router/about')
})// webpack.config.js
module.exports = {
output: {
// 单独对分包的文件进行命名
chunkFilename: '[name]_chunk.js'
}
}module.exports = {
// 优化配置
optimization: {
/*
设置生成chunkId的算法
- `named`
- `deterministic` → 确定性的,在不同的编译中不变的短数字
- `natural` → 按照数字的顺序使用id
- 不利于浏览器缓存
*/
chunkIds: '',
// 抽取主入口文件的webpack运行时
runtimeChunk: {
name: 'runtime'
},
splitChunks: {
chunks: 'all',
// 当一个包大于指定的大小时,继续拆包
// maxSize: 20000,
// 拆包的最小值
minSize: 100,
// 自定义拆包
cacheGroups: {
common: {
test: /[\\/]common[\\/]/,
name: 'common',
reuseExistingChunk: true,
priority: 10
},
vendor: {
test: /[\\/]node_modules[\\/]/,
name: 'vendor',
reuseExistingChunk: true,
enforce: true,
priority: 20
}
}
}
}
}prefetch(预获取)和preload(预加载)
在声明import时,使用以下指令,来告知浏览器
- prefetch:将来某些导航下可能需要的资源
- preload:当前导航下可能需要的资源
区别
- preload的chunk会在父chunk加载时,以并行的方式开始加载。prefetch的chunk会在父chunk加载结束后开始加载
- preload的chunk有中等优先级,并立即下载。prefetch的chunk在浏览器闲置时下载
- preload的chunk会在父chunk中立即请求,用于当下时刻。prefetch的chunk会用于未来的某个时刻
CDN
CDN叫做内容分发网络,是指相互连接的网络系统,利用最靠近每个用户的服务器。
CDN的两种用法
- 打包所有静态资源,放到CDN服务器 → 改变
output.publicPath - 第三方资源放到CDN服务器
// 第三方资源放置到CDN服务器
module.exports = {
	externals: {
		dayjs: 'dayjs'
	}
}shimming预支全局变量
用于给我们的代码填充一些垫片来处理问题,比如现在依赖一个第三方库,这个库本身依赖lodash,但是默认没有对lodash进行导入,那么就可以通过ProvidePlugin来实现shimming效果
module.exports = {
	plugins: [
		new ProvidePlugin({
			dayjs: 'dayjs'
		})
	]
}
提取css代码
npm i -D mini-css-extract-pluginconst MiniCssExtractPlugin = require('mini-css-extract-plugin')
module.exports = {
module: {
rules: [
{
test: /\.css$/,
use: [MiniCssExtractPlugin.loader, 'css-loader']
}
]
}
}hash、chunkhash、contenthash
通过MD4的散列函数处理后,生成一个128位的hash值(32个16进制)
- hash:与项目有关,无论项目中的哪个文件发生改变,都会变
- contenthash:与名称有关,对应名称的文件内容发生改变,不会影响另外文件的hash值
- chunkhash:包含一个chunk的所有元素,无论哪个模块发生改变都会发生改变
JavaScript和CSS的压缩
- terser工具
npm i terser -D
npx terser ./src/common/cache/index.js -o ./src/common/cache/cache.min.js -c arguments=true,arrows=true -m keep_classnames=false- 在webpack中使用terser
module.exports = {
	optimization: {
		minimize: true,
    minimizer: [
      new TerserPlugin({
        extractComments: false,
				terserOptions: {
					compress: {
						arguments: true,
						unused: true,
						drop_console: true
					},
					toplevel: false,
					mangle: true
				}
      }),
    ],
	}
}- css压缩
npm i css-minimizer-webpack-plugin -Dmodule.exports = {
optimization: {
minimize: true,
minimizer: [
new TerserPlugin({
extractComments: false,
terserOptions: {
compress: {
arguments: true,
unused: true,
drop_console: true
},
toplevel: false,
mangle: true
}
}),
new CssMiniWebpackPlugin()
],
}
}tree shaking
- JavaScript实现tree shaking
- useExports
- 导入模块时分析哪些模块有被使用
- sideEffects
- 在
package.json文件中配置
- 在
- useExports
{
	sideEffects: [
		"*.css"
	]
}- CSS实现tree shaking
npm i purgecss-webpack-plugin -Dmodule.exports = {
plugins: [
new PurgeCSSPlugin({
paths: glob.sync(path.resolve(process.cwd(), './src/**/*').replace(/\\/g, '/'), { nodir: true })
})
]
}scope hosting(作用域提升)
将多个模块的代码尽量放到同一个模块,称之为作用域提升
module.exports = {
	plugins: [
		new webpack.optimize.ModuleConcatenationPlugin()
	]
}
HTTP压缩
流程
- HTTP数据在服务器发送前已经压缩(在webpack完成)
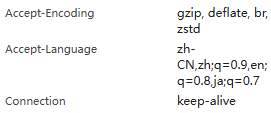
- 浏览器向服务器发送请求时,告知服务器自己支持哪些压缩格式
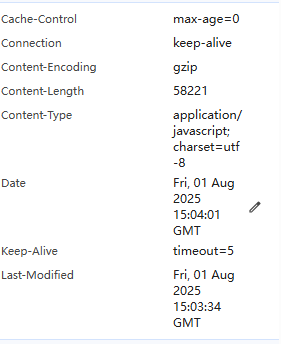
- 服务器直接返回被压缩后的文件,并在响应头中告知浏览器
流程2
流程3
HTML压缩
利用html-webpack-plugin插件
module.exports = (isProduction) => {
	return {
		plugins: [
			new HtmlWebpackPlugin({
					template: './index.html',
					cache: true,
					minify: isProduction
						? {
								// 移除注释
								removeComments: true,
								// 移除空属性
								removeEmptyAttributes: true,
								// 移除冗余属性
								removeRedundantAttributes: true,
								// 折叠空白
								collapseWhitespace: true,
								// 压缩内联css
								minifyCSS: true
						  }
						: false
				})
		]
	}
}
打包时间分析
npm i speed-mesaure-webpack-plugin -Dconst SpeedMeasurePlugin = require('speed-measure-webpack-plugin')
const smp = new SpeedMeasurePlugin()
// webpack配置
const config = {}
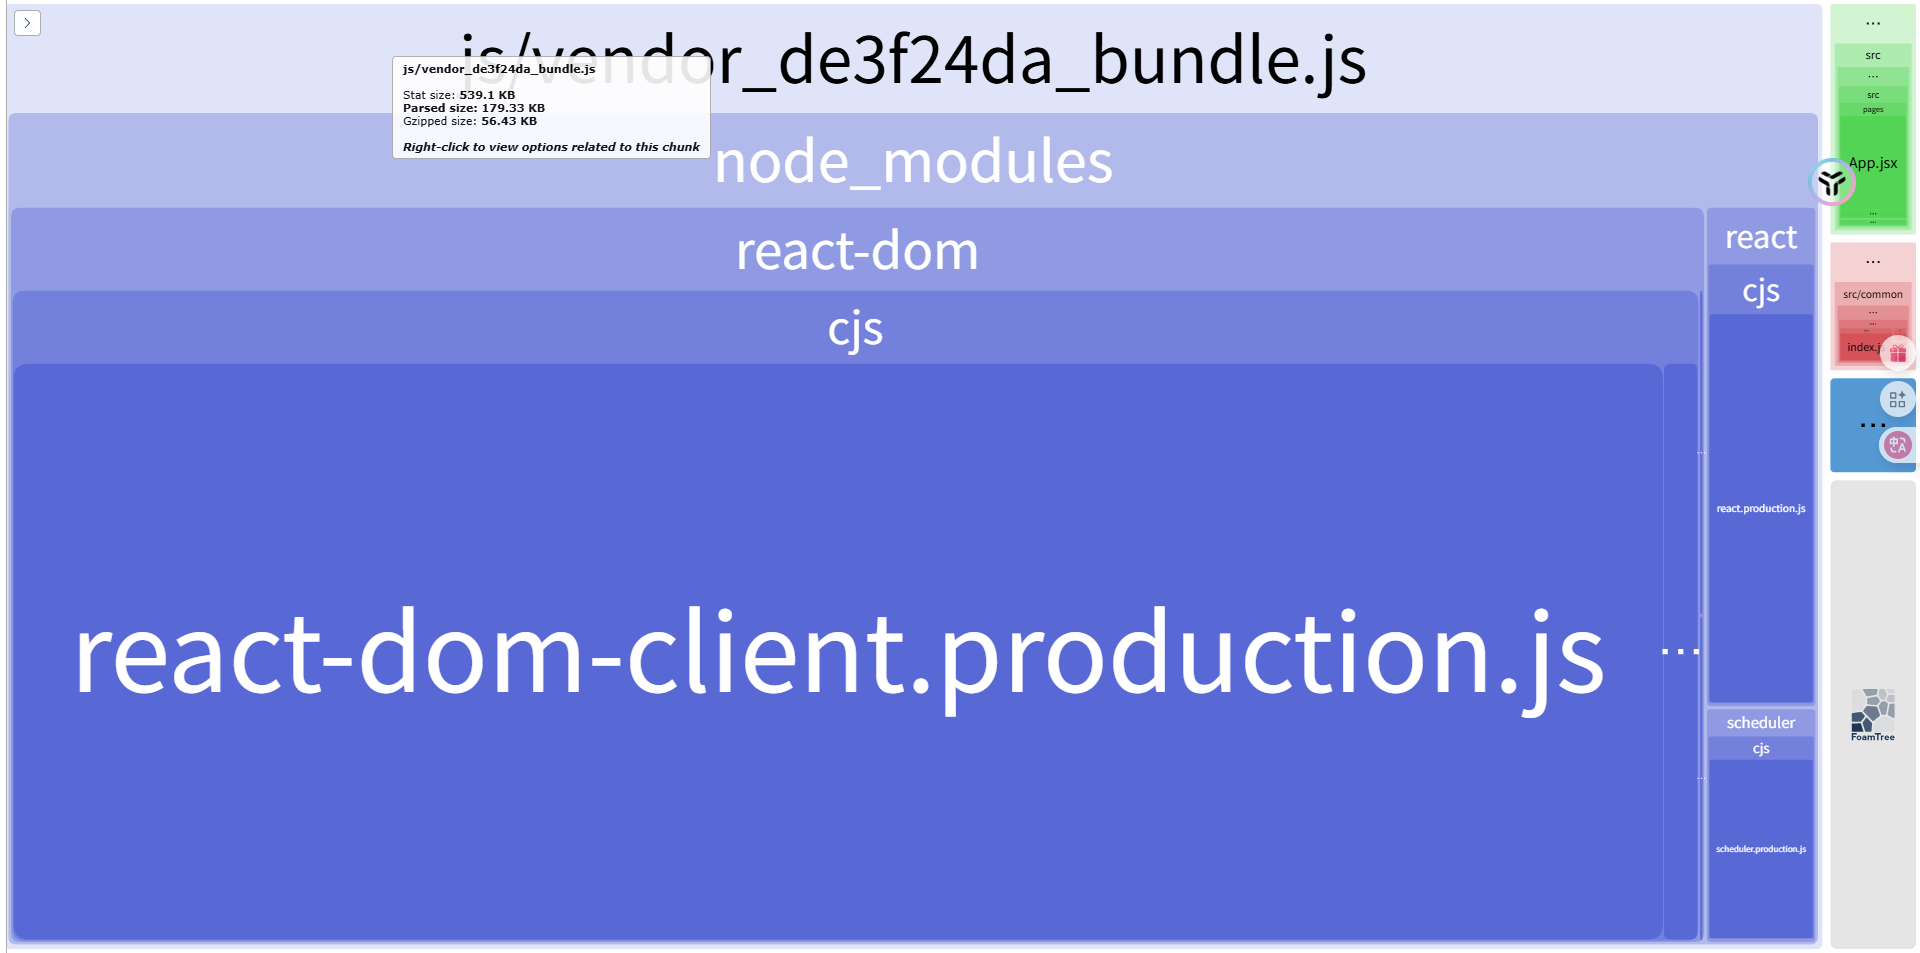
module.exports = smp.wrap(config)打包文件分析
- 方案一:打包时生成
stats.json文件
{
	"scripts": {
		"build": "webpack --config ./config/webpack.prod.js --env production --profile --json=stats.json",
	}
}- 方案二:
webpack-bundle-analyzer- 打包时会自动打开127.0.0.1:8888
npm i webpack-bundle-analyzer -Dconst { BundleAnalyzerPlugin } = require('webpack-bundle-analyzer')
module.exports = {
plugins: [
new BundleAnalyzerPlugin ()
]
}
九、自定义loader
- loader的本质是一个导出为函数的JavaScript模块
- 该函数接收三个参数:
- source: 源代码
- map:source map相关数据
- meta:一些元数据
什么是同步的loader和异步的loader?
- 默认创建的loader就是同步的loader
- 这个loader必须通过
return或者this.callback来返回结果,交给下一个loader处理 - 通常在有错误的情况下,会使用
this.callback - callback
- parameters 1:表示错误信息
- parameters 2:表示要向上一个loader传递的内容
- async:异步的loader
module.exports = function(source) {
	return source.replace(/console\.log\(.+\);?/g, '')
	// 或者
	const callback = this.callback
	callback(null, source.replace(/console\.log\(.+\);?/g, ''))
}module.exports = function(source) {
// 或者
const async = this.async()
setTimeout(() => {
async(null, source.replace(/console\.log\(.+\);?/g, ''))
}, 2000)
}loader传参
- 使用
loader-utils - 使用
this.getOptions
const jsLoader = function (source) {
	const callback = this.callback
	const options = this.getOptions()
	const { name, age } = options
	console.log(`name: ${name}, age: ${age}`)
	callback(null, source.replace(/console\.log\(.+\);?/g, ''))
}

module.exports = jsLoader
loader参数校验
npm i schema-utils -D{
"type": "object",
"properties": {
"name": {
"type": "string"
},
"age": {
"type": "number"
}
}
}const { validate } = require('schema-utils')
const schema = require('./schema.json')
const jsLoader = function (source) {
const callback = this.callback
const options = this.getOptions()
const { name, age } = options
validate(schema, options)
callback(null, source.replace(/console\.log\(.+\);?/g, ''))
}
module.exports = jsLoader实现md-loader
const { Marked } = require('marked')
const highlightJs = require('highlight.js')
const { markedHighlight } = require('marked-highlight')
const mdLoader = function (source) {
	const marked = new Marked(
		markedHighlight({
			emptyLangClass: 'hljs',
			langPrefix: 'hljs language-',
			highlight(code, lang) {
				const language = highlightJs.getLanguage(lang) ? lang : 'plaintext'
				return highlightJs.highlight(code, { language }).value
			}
		})
	)
	const htmlContent = marked.parse(source)
	// 返回的结果必须是模块化内容
	const innerContent = '`' + htmlContent + '`'
	const moduleContent = `var code = ${innerContent};\nexport default code`
	return moduleContent
}

module.exports = mdLoader
十、自定义plugin
tapable
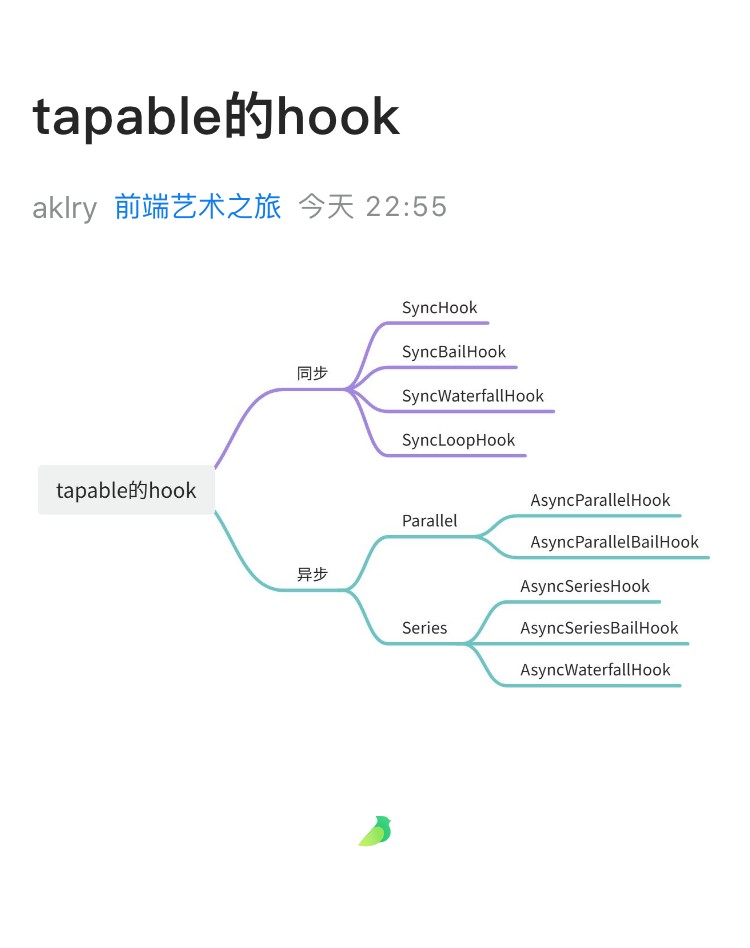
同步和异步
- sync
- async
其他类别
- bail:有返回值时,不会执行后续的操作
- loop:当返回值为true时,就会反复执行,返回值为undefined或者不返回值时,就退出事件
- waterfall:当返回值不为undefined时,会将此次返回的结果作为下次事件的第一个参数
- parallel:并行,不会等到上一个执行事件回调执行结束,才执行下一次事件处理回调
- series:串行,会等待上一次异步的hook
webpack如何注册plugin
- 在webpack函数的
createCompiler方法中注册了所有插件 - 在注册插件时,会调用插件函数或者插件对象的apply方法
- 插件方法会接收compiler对象,可以通过compiler对象来注册hook的事件
- 某些插件也会插入一个compilation的对象,也可以监听compilation的hook事件
实现AutoUploadAssetsWebpackPlugin
const { Compiler } = require('webpack')
const { NodeSSH } = require('node-ssh')
const fs = require('fs')
const path = require('path')
const archiver = require('archiver')
class AutoUploadAssetsPlugin {
	constructor(config) {
		this.config = config || {}
	}
	/**
	 * @param { Compiler } compiler
	 */
	apply(compiler) {
		compiler.hooks.afterEmit.tapAsync('AutoUploadAssetsPlugin', async (compilation, callback) => {
			console.log('Assets have been emitted, starting upload process...')
			// 1. 获取输出文件夹
			const outputPath = compilation.outputOptions.path
			// 2. 压缩输出文件夹
			const localFile = path.resolve(process.cwd(), this.config.targetFile)
			await this.compressFile(outputPath, localFile)
			// 3. 连接远程服务器
			const sshClient = await this.connectToServer()
			// 4. 删除远程服务器上的旧文件
			await this.runCommander(sshClient, `rm -rf ${this.config.releaseDir}`, this.config.deployDir)
			// 5. 上传新文件
			await this.uploadFile(sshClient, this.config, localFile)
			// 6. 解压缩远程服务器上的文件
			await this.runCommander(sshClient, `unzip ${this.config.releaseDir}`, this.config.deployDir)
			// 7. 删除远程服务器上的压缩包
			await this.runCommander(sshClient, `rm -rf ${this.config.releaseDir}`, this.config.deployDir)
			// 8. 重命名
			await this.runCommander(sshClient, `mv dist ${this.config.releaseDir}`, this.config.deployDir)
			// 9. 断开连接
			sshClient.dispose()
			callback()
		})
	}
	connectToServer() {
		const sshClient = new NodeSSH()
		return new Promise(resolve => {
			sshClient.connect(this.config.ssh).then(() => {
				console.log('Connected to server successfully')
				resolve(sshClient)
			})
		})
	}

	runCommander(ssh, command, path) {
		return new Promise(resolve => {
			ssh.execCommand(command, { cwd: path }).then(result => {
				resolve()
			})
		})
	}

	compressFile(targetDir, localFile) {
		return new Promise(resolve => {
			// 创建可写流
			const output = fs.createWriteStream(localFile)
			const archive = archiver('zip', {
				zlib: { level: 9 }
			})
			archive.pipe(output)
			archive.directory(targetDir, 'dist')
			archive.finalize()

			archive.on('close', () => {
				console.log((archive.pointer() / 1024 / 1024).toFixed(2), 'MB')
				resolve()
			})
		})
	}

	uploadFile(ssh, config, local) {
		return new Promise(resolve => {
			ssh.putFile(local, this.config.deployDir + config.releaseDir)
				.then(() => {
					console.log('upload success')
					resolve()
				})
				.catch(err => {
					console.log(err)
				})
		})
	}
}

module.exports = AutoUploadAssetsPlugin
module.exports.AutoUploadAssetsPlugin = AutoUploadAssetsPlugin